memo frame

Memo frame: the fanciful whiteboard

Memo frame? My memory is strange, I remember conversations literally for years, if you tell me “let’s meet here in six years at 6pm”, I will remember it exactly. I can tell you precisely how you were dressed that day eight months ago, but on the contrary I could easily leave home without a bag, or forget where I was going or what I was doing at the time I was doing it.
To try to fill this gap, I thought of using a whiteboard as a memo, but often they are too big or need to hang on the wall. Living in a small apartment I opted for a memo frame instead of the classic blackboards. Easy to use on any surface, in case you need to keep an eye on the memo and absolutely customizable according to your taste or the furnishing of your home or office.

If you also want to add style to your memo boards by doing away with the usual blackboards and cork panels, follow my video tutorial and you won’t risk leaving your home or office forgetting what you needed. (Our head is attached, no memo is necessary, so as not to loose it, just check it occasionally :-p).
 

MATERIALS NEEDED

  • A frame. I used FISKBO from IKEA, but you can use any frame of your choice that best suits your ambience and style.
  • Decorative paper. You can use anything, like rice paper or newspaper, free your imagination.


TIPS AND TRICKS
To make the memo frame more eco-friendly, you can use recycled paper:

  • I, for example, used an old gift bag that I had saved. It can be both a good way to recycle and reuse a paperl you liked but couldn’t have used differently;
  • You could use a larger frame to hang on the wall, so that beside a memo board you also have a modern and original piece of art when it’s not used for memos:
    memo frame wall
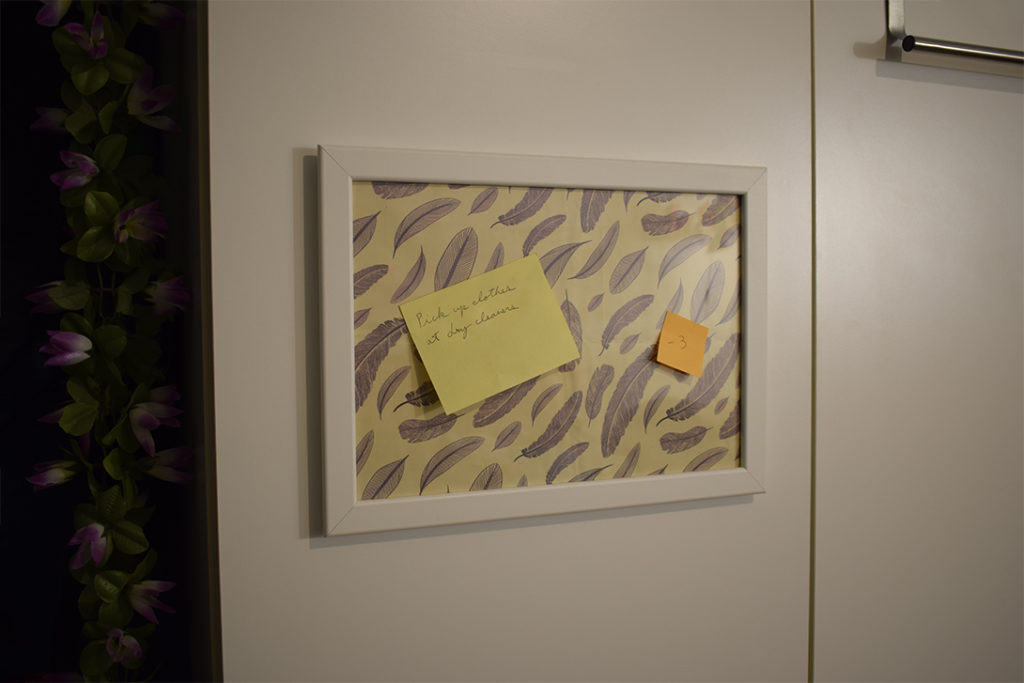
  • don’t limit it to the wall! You can attach it to the door, with extra strong tape like Pattex “No More Nails” Adhesive Tape. I have created another medium size memo frame to attach to the closet door, the result is certainly impressive and undoubtedly very useful.
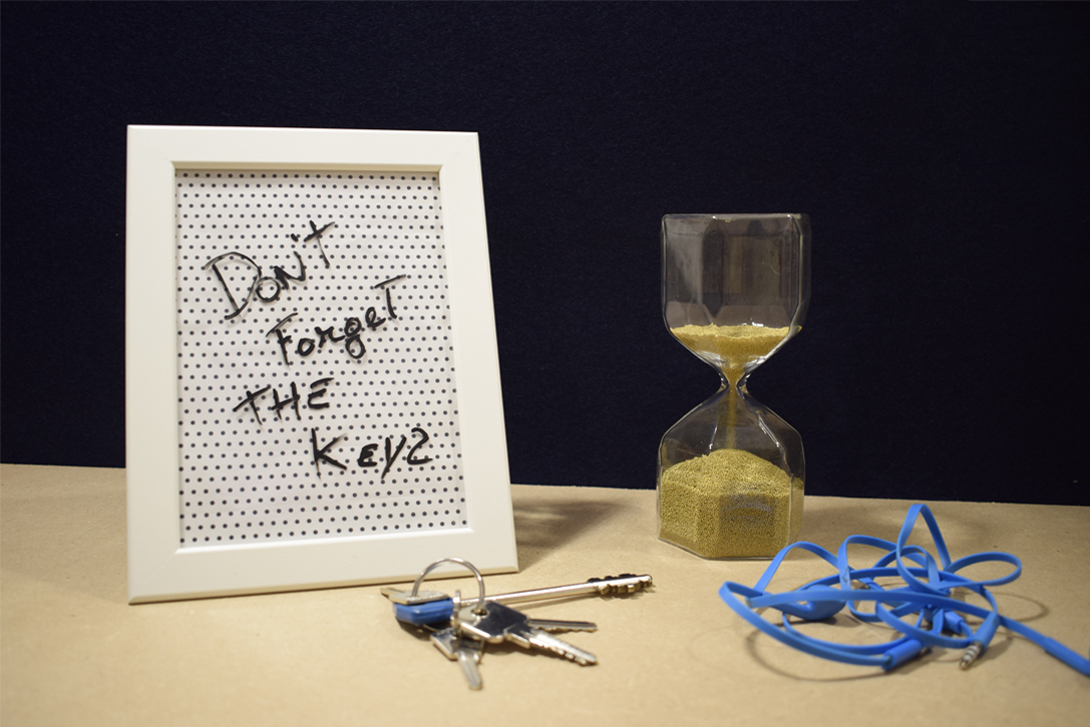
  • to write on memo frame you can use any erasable marker pen for whiteboards, but for a more particular touch I suggest to use the erasable chalk effect markers such as these Stationery Island Chalk
  • .

Tissue box Super Mario

SuperBox: Super Mario tissue box

How many times we have had to live in close contact with a tissue box, especially during a seasonal illness, to get bored of always seeing the usual monotonous writing.
I therefore thought of giving the package a new look, transforming it into a Super Mario block.

If you want to try it yourself follow my video tutorial to create your tissue box.
 

MATERIALS NEEDED

  • A square box of tissues.
  • Glue stick.
  • Acrylic Colors.
  • Brushes.
  • White cardboard.


TIPS AND TRICKS
Once the tissues are finished, you could reuse the “super box” as:

  • container, perhaps to contain the 3DS game cards (or old GameBoy cards)
  • piggy bank, to recall even more the blocks of the legendary Super Mario!
problem pillow case

Problem pillow: the do it youserself pillow

During a shopping trip I saw a wonderful T-shirt with the inscription “problem maker“, perfect for me if not for the small detail that it did not fit me. Despite this I couldn’t leave it, so it came to my mind that it could become an excellent pillow and given the low price I bought it: hence the name “problem pillow” 🙂

If you too have found a favorite T-shirt but it’s not your size, or if you don’t want to get rid of an old companion of adventures, following my video tutorial you can easily turn it into a pillow case.


MATERIALS NEEDED

  • A pillow.
  • A t-shirt.


TIPS AND TRICKS
To do the “problem pillow” I used the sewing machine, but if you prefer:

nutellamp lamp nutella

Nutellamp: Lamp and Nutella combination

Finishing a can of Nutella is certainly a disheartening moment, I tried to make the event more “radiant” transforming it into a lamp better defined as “Nutellamp” 🙂

Besides being useful and functional, it’s a great way to recycle, so if you want your “Nutellamp” you can follow my video tutorial and once you have finished a jar of Nutella (so it will be very easy: -p), you won’t have to roll up your sleeves.


MATERIALS NEEDED


TIPS AND TRICKS
You can use “Nutellamp” in a variety of ways:

  • as night light around the house;
  • to give a special touch to the kitchen;
  • as a dining centre for breakfast;
  • by filling it with marbles or other decorative elements, so as to create a play of light when switched on and give it more character when turned off.
magnetscrews

Magnetscrews: personalized magnets for your fridge

Have you ever had a post-it or cards sticked to the refrigerator by a piece of scotch or holiday souvenir magnets? It happens very often to me, so I decided to make simple personalized magnets that work a bit like the classic cork board tips.
I had the idea of “magnetscrews” to give to the refrigerator and the wall board an even more interesting look!

Following my video tutorial you can easily make the “magnetscrews” to restyle your desk or as a gift to someone who loves DIY.
 

MATERIALS NEEDED

  • Flat-tipped screws: Easily available from hardware stores or in a home depot.
  • High sealing glue: I have used the B-7000 but the Attak or similar is fine.
  • Magnet: I used those in neodymium, because they have more magnetic power than ferrite in the same size. You can find them online (Magnet Expert High Grade N42 (NdFeB) Neodymium Magnet), in the hobbies store or model shops.


ITPS AND TRICKS
For an even more interesting effect of “magnetscrews“:

  • you could give the screws a touch of colour buying them already coloured like Viti Pig: Neon Skewers 1″ Phillips;
  • you could give the screws a touch of colour by tinting them with the spray can;
  • if you have a magnetic surface, such as a clipboard, you can use the screws directly without the magnet, which will make the “screwed” effect even more realistic.
damaged bag

Damaged bag: How to repair the magnetic closure

A few months ago, I bought a bag that started to deteriorate on the magnetic closure after very little time. I was sorry to have to throw it away because the rest was still in a very good condition, so I thought to cover the damage magnetic closure with a charm.

If you too have a bag with a damaged closure, you can use this small expedient to hide the defect and make it even more interesting and personal. Following my video tutorial you can give a new life to your damaged bag.
 

MATERIALS NEEDED

  • Bag: damaged or to be customized.
  • Pendant: you can use one you have at home, buy it online or in a hobby shop.
  • Glue: The E6000 Multi Purpose Adhesive would be the most suitable. I used the B-7000 which is just as good, but you can use any elastic seal glue, so as to ensure that the pendant does not comes off with the movements of the fabric or if you pull it accidentally.


TRUCCHI E SUGGERIMENTI
To repair and personalize your damaged bag you could: